
1. Upload the floor plan
- In the editor, choose Floorplan in the bar at the top. If the tour has none yet, choose Upload floorplan image and pick a JPG or PNG of the layout.
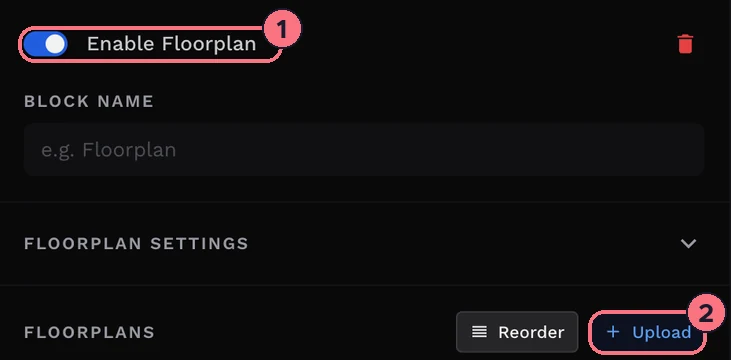
- Make sure Enable Floorplan (1) is on, so visitors can see it.
- For another floor, choose + Upload (2). Each floor appears in the Floorplans list; give it a name such as “Ground floor”, and use Reorder to change their order.
Switch between floors with the floor menu at the top left of the plan.
2. Add a marker for each room
- Choose Add marker (3) in the hint below the plan. The marker appears in the middle of the plan.
- Drag it onto the room.
- Repeat for every room that has a panorama.

Each floor’s Markers list on the right shows every marker. Open one to change its Size or Rotate it.
3. Link each marker to its panorama
A marker does nothing until it’s linked. In the Markers list, a marker that isn’t linked yet says Not linked. Choose Add Link and pick the panorama for that room. The hint’s Link marker button does the same for the next unlinked marker.
Floorplan settings
Open Floorplan Settings to choose how the plan looks in the tour:
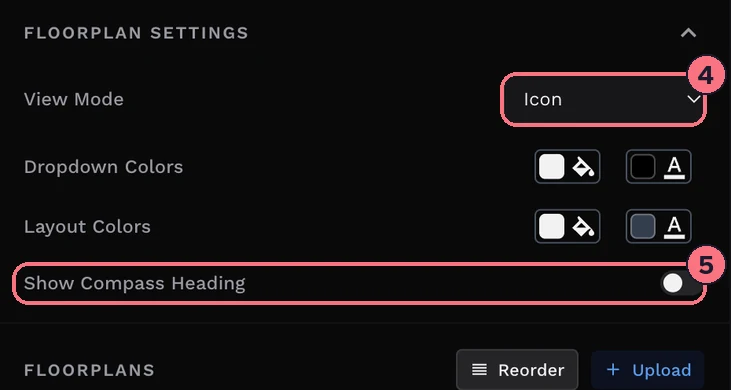
- View Mode (4)Expanded shows the plan open in the tour. Icon shows a button that opens it. On phones it always opens from a button, to leave room for the panorama.
- Dropdown and Layout ColorsThe background and text colours of the floor menu and the plan’s panel, to match your brand.
- Show Compass Heading (5)The current room’s marker turns to show which way the visitor is looking. Set north on your panoramas so it points the right way.
Change or remove a floor plan
- New drawing of the same floor: replace the image from the floor’s row. The editor asks whether to move the existing markers onto the new image.
- Remove one floor: delete it from its row. The editor asks you to confirm.
- Remove the floor plan from the tour: choose the red bin next to Enable Floorplan, and confirm. To hide it without deleting it, turn Enable Floorplan off instead.
Tips
- Use a clean, light drawing. A simple plan with room names reads well at small sizes; a photo of a printed plan doesn’t.
- Adding markers needs a subscription or a free trial; otherwise the panel shows Upgrade to add marker.
Common questions
Can I add a floor plan to a virtual tour?
Yes. In TeliportMe, upload a JPG or PNG of the layout in the editor’s Floorplan view, add a marker for each room, and link each marker to that room’s panorama.
Can I add more than one floor?
Yes. Choose + Upload for each floor and give it a name, such as “Ground floor”. Visitors switch floors with the floor menu at the top left of the plan.
Does the floor plan show which way visitors are looking?
Yes, with Show Compass Heading on: the current room’s marker turns with the visitor’s view. Set north on your panoramas so it points the right way.
Do I need a paid plan to add floor plan markers?
Adding markers needs a subscription or the free trial, which includes every feature for one tour. Without either, the panel shows Upgrade to add marker.